
Storage feature

Storage lets you upload, organize and manage files directly in oneCORE. Your files are stored in your own Cloudflare R2 bucket, and oneCORE keeps everything in sync, so changes made on either side are always reflected.


Permission

To access and manage the Storage feature, users are required Storage permission. Once the permission is granted, the feature will be available under Files menu. To start a manual sync, users are also required StorageSync permission. See the details of manual sync in the next topic. 

bg-big

Connect bucket

oneCORE does not host your files itself. Instead, you connect one or more Cloudflare R2 buckets, and each connected bucket appears as a source in Storage. You keep full ownership of your buckets and manage them in your own Cloudflare account. Setting up Storage takes steps on both the Cloudflare side and the oneCORE side.


Connect a bucket

Connecting a bucket takes two parts: allowing oneCORE to access the bucket in Cloudflare, and adding the bucket as an API setting in oneCORE.


Cloudflare setting

Connect with Cloudflare, you must navigate to Storage & Database > R2 Object Storage > [bucket name] > Settings > CORS Policy and click Add.
Paste the policy below and replace https://your-domain.com with the domain you shop's URL. This allows oneCORE to upload files to your bucket.

[
  {
    "AllowedOrigins": ["https://your-domain.com"],
    "AllowedMethods": ["GET", "PUT", "POST", "DELETE", "HEAD"],
    "AllowedHeaders": ["*"],
    "ExposeHeaders": ["etag"],
    "MaxAgeSeconds": 3600
  }
]

oneCORE setting

1. Go to API settings under Management menu and click Add.

2. Select the type CloudFlareR2Bucket.

3. Fill in the settings below and save.

4. Go to Files menu > Storage. Connected buckets will appear as sources. Files that are already in the bucket appear in the library after the first sync.


CloudFlareR2Bucket API settings

1. Type: CloudFlareR2Bucket

2. ApiValue1* to input the Access key

3. ApiSecret1* to input SecretKey

4. ApiValue2* to input Bucket name

5. ApiSecret2* to input Cloudflare account ID

There is no limit to the number of buckets. Create the API settings for every bucket you want to connect.


bg-big

Set up "Realtime sync"

Realtime sync is optional and set up per bucket. Changes you make in oneCORE are always applied to your bucket straight away without realtime sync enabled, and changes made in Cloudflare are still picked up by automatic sync without this setup.

The realtime sync is suggested only if your team often change files directly in Cloudflare and would like to see those changes in oneCORE right away.

Make sure the bucket is already connected (see Connect a bucket above) before you set up realtime sync. 


Note: We recommend reading Sync logic below before you start. It explains how the different types of sync work together and how Cloudflare bills for Queues, so you can decide whether realtime sync is right for you.


Cloudflare side

1. Create a queue under Compute > Queues. The queue collects a message for every change in your bucket. oneCORE reads these messages to know which files were added or removed. Queues are billed by Cloudflare to your account based on the number of messages.

2. Go to Storage & Database > R2 Object Storage > [bucket name] > Settings > Event Notifications and click Add. An event notification tells Cloudflare to send a message to the queue whenever a file in the bucket changes. Without it, the queue stays empty and oneCORE only sees Cloudflare changes through automatic sync.

3. Select the queue you created in step 1.

4. Select the event types. We recommend checking both:

- Creation of a new object 

- Deletion of an object

5. Create a Cloudflare API token with Edit permission for Queues, and copy it for oneCORE API Setting. 


oneCORE setting

1. Go to API settings under Management menu and click Add.

2. Select the type CloudFlareR2RealtimeSync.

3. Fill in the settings below and save.


CloudFlareR2RealtimeSync API settings

1. Type: CloudFlareR2RealtimeSync

2. ApiValue1* to input the Cloudflare API token with Edit permission for Queues from step 5.

3. ApiSecret1* to input Secret Key for Queues from step 5. 

4. ApiSecret2* to input Cloudflare account ID

bg-big

File and folder management


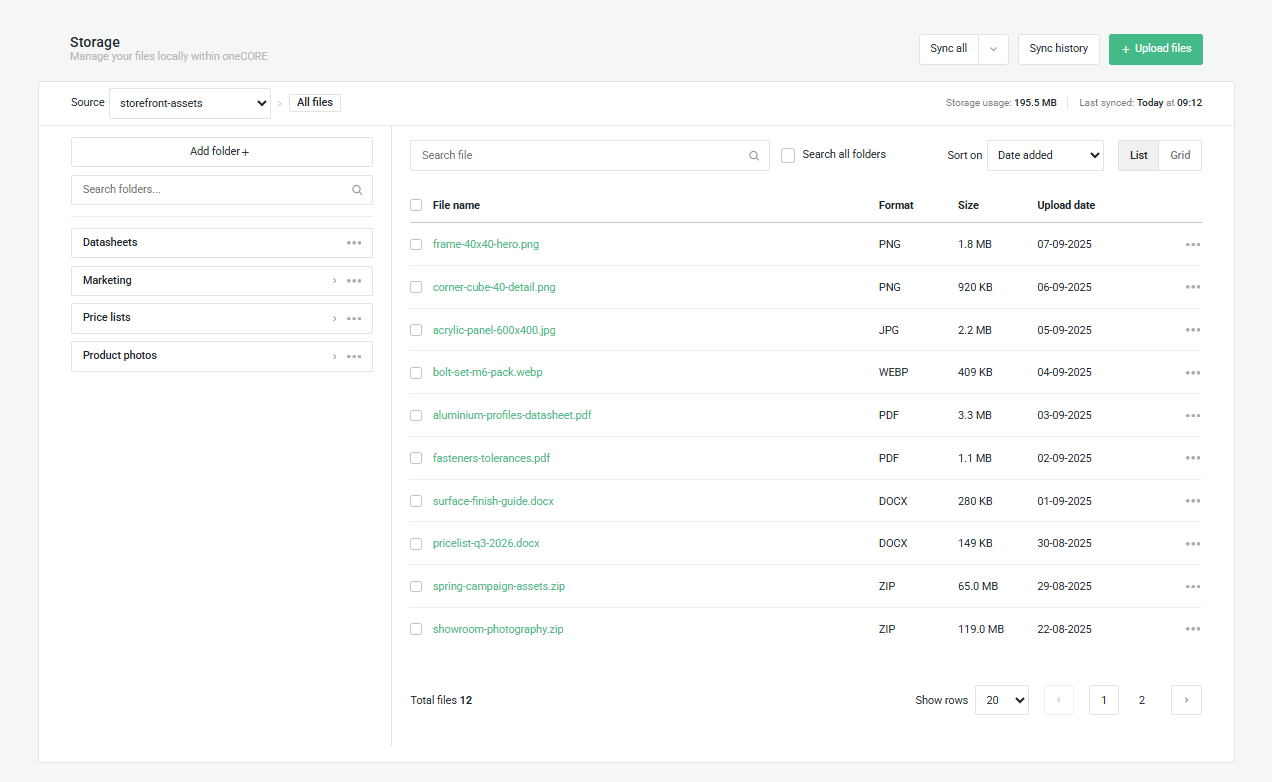
File library

The library lists all files in your connected buckets with their name, format, size and upload date. You can search by file name, filter by source, and sort by Date added, Size, Name A–Z or Name Z–A.


Work with multiple buckets

- Source filter – show only the files from the selected bucket.

- Storage used – see how much storage your files currently use.

- Upload – choose which bucket and folder a file is uploaded to.

- Folders – every bucket has its own folder structure. Files can only be moved between folders in the same bucket.


Upload files

- Click Upload.

- Select the source (bucket) and folder to upload to.

- Choose your files and click Upload.

The maximum file size and any file type restrictions are set by Cloudflare.


Manage files

  1. Open – opens or previews the file in a new tab.
  1. Copy link – copies a temporary link to the file. Due to Cloudflare restrictions, the link is valid for 30 minutes, so we don't suggest that you paste them into your pages.
  1. Rename – changes the file name. The file is also renamed in your Cloudflare bucket.
  1. Move – moves the file to another folder in the same source.
  1. Delete – removes the file from the library and deletes it from your Cloudflare bucket.


Manage folders

Folders belong to a single source and can be nested on multiple levels. Every folder action is applied to your Cloudflare bucket as well.

  1. Create folder – adds a new folder in the current source.
  1. Rename folder – changes the folder name and moves its files to the new folder. Large folders are processed in batches of 1,000 files, so it can take a while before all files appear in the renamed folder.
  1. Delete folder – deletes the folder from the library and from your Cloudflare bucket. Delete folders will also delete all files in it. 
bg-big

Sync logic

Changes you make in oneCORE are applied to your Cloudflare bucket straight away. Changes made directly in Cloudflare reach oneCORE through sync. To make sure your library always matches your buckets, oneCORE keeps your files and folders in sync in three ways:

  1. Automatic sync – runs in the background and processes up to 1,000 files per hour. No setup is required.
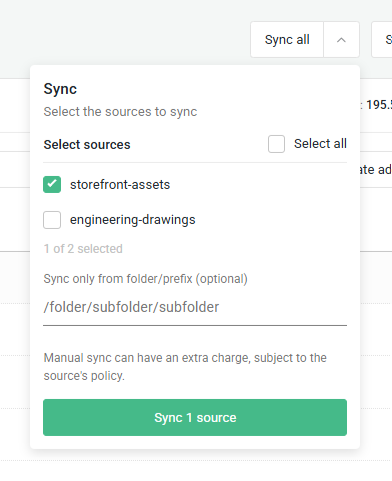
  1. Manual sync – manully starts a full sync at any time by yourself. Requires the StorageSync permission. A manual sync can add charges to your Cloudflare bill depending on the number of files in the bucket. Any costs charged by Cloudflare are outside of oneCORE’s scope.

- Sync all will sync all buckets and folders

- Sync some bucket or folders by selecting the buckets or enter a folder path

  1. Realtime sync (optional) – Shows changes made in Cloudflare in oneCORE within about a minute. This requires event notifications on the bucket. See Set up realtime sync above. Realtime sync uses Cloudflare Queues, which Cloudflare bills to your own account. Any costs charged by Cloudflare are outside of oneCORE’s scope.


Sync history

Open Sync history to see the status and timestamp of every sync. You can filter by period and trigger (any, manual, scheduled, realtime, folder rename) and source.